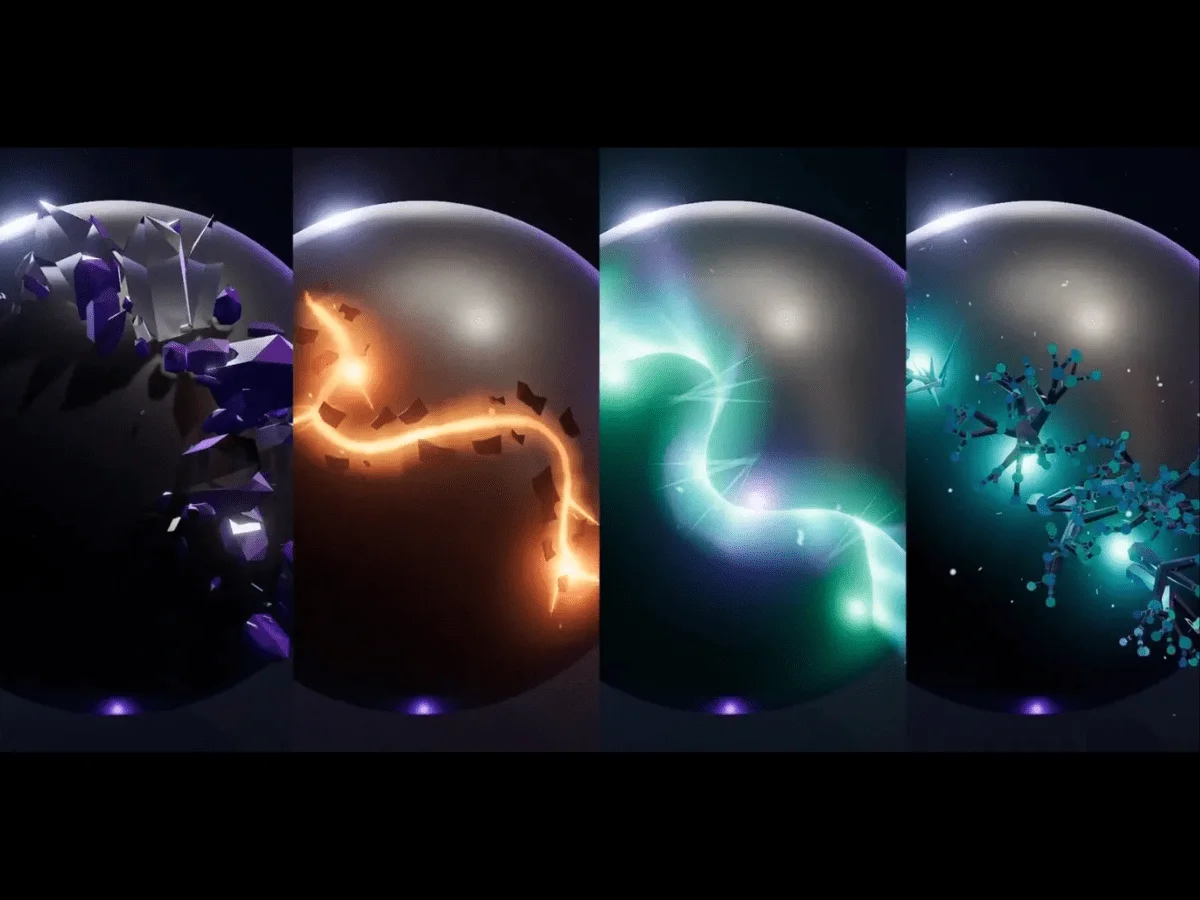
Editor’s note: With the first Three.js Conference heading to Paris this September, we’ve been looking at some of the creative work emerging from the Three.js community. Today, we’re excited to feature Chiro Visuals, whose striking experiments have been turning heads on X. In this tutorial, he takes us behind his Geometry Painter, exploring how Three.js, WebGPU, and TSL can transform a simple stroke into everything from glowing crystals and molten cracks to aurora silk and a living bioluminescent reef. There’s a lot of beautiful experimentation here, but also some clever ideas about building the system behind it. We hope you enjoy exploring it with us.
🎟️ Still no ticket? As part of our partnership with the first Three.js Conference, Codrops readers can use the code CODROPS to get 15% off. Get your ticket →
Drag a stroke across a floating sphere and watch crystal veins, molten cracks, aurora silk or a bioluminescent reef grow out of the surface, a look at instancing, TSL node materials, live parameter systems, and the small architectural decision that lets a new painting mode plug in without touching a single line of the painting code.
The first version painted plants, was called VegetationGeneratorThreeJS, and did exactly one thing: trees along a stroke. After a week of living with it, I realised the interesting part wasn’t the trees at all. It was the seam between “here is a path across a surface” and “here is what grows on it”. Everything on the left of that seam is the same forever: raycasting, resampling, undo, orbit. Everything on the right is a different art project every time.
So I threw the plants out and rebuilt the thing around that seam. Four modes ship today: crystals, molten fissures, aurora silk, and a bioluminescent reef, and each one was written without opening the painting code once.
Here’s what I want to cover:
- Turning a drag into geometry: picking with a BVH, why raw pointer events are useless as a path, and the coordinate-space bug that eats an afternoon if you don’t see it coming.
- The mode contract: the twenty lines that make a painting mode pluggable.
- Making every slider live: how to build a system where dragging a density slider never regenerates anything, and why that constraint made the modes better, not just faster.
- Four shaders: transmissive quartz, a blackbody crack ribbon, fold-locked aurora silk, and a bioluminescence wave that lives in world space.
- The look: a studio built out of six glowing rectangles, and the post chain on top of it.
Everything below has a demo page you can open, poke, and watch on its own. They live under /demos in the repo. Run npm run dev and go to /demos/; they use the production code wherever possible, and I’ll link the relevant one as we go. Honestly, I built them for this article and then kept using them for debugging, which probably tells you something about how I should have been working all along. Explore all the demos.
The concept
The reference image in my head was a geode: a dull grey rock that somebody cut open, and inside, this violent violet interior that has no business being there. That contrast is the whole idea. The canvas sphere is deliberately boring: satin basalt, a whisper of clearcoat, because the crystals have to be the only interesting thing in frame.
That decision drove more of the codebase than I expected. If the canvas is matte and dark, then whatever you paint on it must supply its own light: transmission, emissive, additive ribbons, point lights riding along the stroke. Every mode ended up with some version of “this thing glows from the inside”, not because I planned it, but because anything that didn’t glow just vanished into the sphere.
The implementation
One pointer event, one surface sample
Painting on a mesh is a raycast, which is the easy part. What each mode actually needs is a little more than a hit point:
export interface SurfaceSample {
  /** World-space hit — used only for the live stroke preview beads. */
  position: THREE.Vector3;
  normal: THREE.Vector3;
  /** Anchor-space hit, captured at pick time. */
  local: THREE.Vector3;
  localNormal: THREE.Vector3;
}
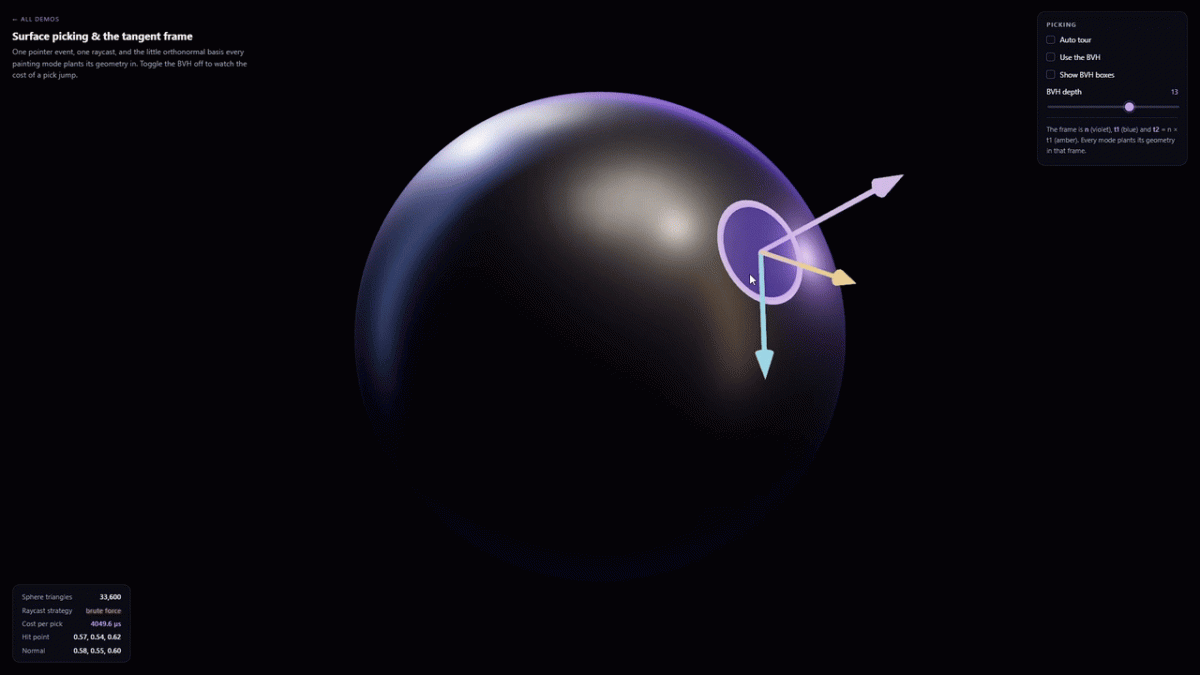
From the normal, we build a tangent frame, and that frame is where everything gets planted. A crystal leans off n by rotating toward t1/t2; a fissure expands sideways along t1 × n; an anemone tendril fans out around n. It’s three lines, and they’re worth staring at once:
const t1 = new THREE.Vector3(1, 0, 0);
if (Math.abs(n.x) > 0.9) t1.set(0, 1, 0); // pick an axis that isn't parallel to n
t1.cross(n).normalize();
const t2 = new THREE.Vector3().crossVectors(n, t1);
The Math.abs(n.x) > 0.9 guard is the only interesting bit. Cross two parallel vectors and you get a zero vector, and a zero vector normalised is NaN, and NaN in a matrix means an instance silently disappears. You will find this bug on the poles of a sphere at 2am.
For picking itself, I patch three-mesh-bvh in globally and build a bounds tree on the canvas:
(THREE.Mesh.prototype as any).raycast = acceleratedRaycast;
// ...
(raycaster as any).firstHitOnly = true;
The firstHitOnly flag matters more than the BVH does, in a way. Without it the raycaster collects every intersection and sorts them, and painting on a closed sphere means you hit the back face too. With it, the traversal bails the moment it has the nearest triangle. The demo page below picks against a 33,600-triangle sphere and prints the cost of a single pick, with a checkbox to drop the bounds tree and go back to testing every triangle.
Pointer events are not a path
Here’s a thing nobody tells you. Pointer events arrive at a fixed rate, not a fixed distance. Move your hand slowly and you get forty samples in a centimetre. Sweep it and you get four across the whole sphere. If you scatter one crystal cluster per sample, which is the obvious first implementation and the one I shipped for about an hour, you end up with a dense clot wherever the user hesitated and nothing at all where they moved.
So every mode resamples before it builds anything:
let travelled = 0;
let next = 0;
for (let i = 0; i < samples.length; i++) {
  if (i > 0) travelled += samples[i].local.distanceTo(samples[i - 1].local);
  if (travelled < next && i !== samples.length - 1) continue;
  next = travelled + PATH_STEP;
  // ... emit a path point with its tangent frame
}
That’s it. Walk through the raw samples, keep track of the accumulated arc length, and emit a point every PATH_STEP world units. Everything else gets thrown away. The crystals drop a cluster every 0.0625 units, while the fissure ribbon steps its centreline every 0.025. The travelled value it gives back ends up doing double duty later too, since it’s also the distance coordinate that drives the whole growth animation.
The demo below shows a pretty typical stroke: 46 raw samples with gaps ranging from 0.002 to 0.089 world units. That’s a forty-four-fold difference between the tightest and loosest pair, all within a single stroke. And this isn’t even an especially erratic one.

The canvas moves while you’re painting
The sphere floats and bobs gently on a slow sine wave while it rotates, because a completely static subject just looks like a screenshot. Painting worked fine in the first build, right up until I let go of the mouse, watched the crystals grow in, and then watched them slide right off the surface like decals on a wet windscreen.
The samples were in world space. Of course they were, that’s what the raycaster gives you. But world space is only really meaningful at the exact moment of the hit. By the time the growth animation finished, the sphere had rotated 15°. So each sample gets converted into the anchor’s local space immediately, at pick time:
this.anchor.updateWorldMatrix(true, false);
this.invAnchor.copy(this.anchor.matrixWorld).invert();
return {
  position: h.point.clone(),
  normal,
  local: h.point.clone().applyMatrix4(this.invAnchor),
  localNormal: normal.clone().transformDirection(this.invAnchor),
};
The important part is that the inverse gets recomputed on every pick instead of being cached for the whole stroke. It has to be, because the anchor is moving between pointer events. A stroke that takes two seconds to draw might be sampled against a hundred slightly different matrices. If you cache the inverse once at pointerdown, you get a more subtle version of the same smear. It only shows up on slow, careful strokes, which is exactly where people are going to notice it.

The mode contract
Now the seam. This is the whole extensibility story and it fits on one screen:
export interface StrokeInstance {
  group: THREE.Group;
  update(dt: number, time: number): void;
  finishGrowth(): void;
  applySettings?(settings: unknown): void;
  dispose(): void;
}

export interface PaintMode<S = unknown> {
  readonly id: string;
  createStroke(samples: SurfaceSample[], seed: number, settings: S): StrokeInstance;
}
A mode is just a factory that turns samples into a living object. The app parents group under the
floating anchor, calls update every frame, calls dispose on undo, and otherwise doesn’t need to
know what’s inside. Registering one is a line in a record:
private modes: Record<ModeName, PaintMode<unknown>> = {
  'Crystals': crystalMode as PaintMode<unknown>,
  'Molten fissures': fissureMode as PaintMode<unknown>,
  'Aurora silk': auroraMode as PaintMode<unknown>,
  'Bioluminescent reef': reefMode as PaintMode<unknown>,
};
The optional applySettings? is the interesting part, and I’ll come back to it in a second. The
short version is that a mode that can re-derive its look from new settings gets live sliders for
free. A mode that can’t still has the option of falling back to a rebuild without forcing the app
to know anything special about that mode.
The seed handling is worth mentioning too. Each stroke keeps a stable index, and the effective seed mixes that with the global seed:
private effectiveSeed(index: number): number {
  return ((this.settings.seed * 2654435761) ^ (index * 40503 + 1)) >>> 0;
}
Knuth’s multiplicative constant, an odd multiplier for the index, and XOR. Nothing particularly clever. The result is that every stroke looks different from its neighbours, while the whole scene still reshuffles coherently when you change the global seed. You don’t get every stroke jumping to the same new arrangement.
Generate at the maximum, cull with the slider
Here’s the constraint I set myself, and it ended up being one of the most productive decisions in
the project: dragging a slider must never allocate anything.
The naive density slider disposes the stroke and rebuilds it. That works fine with twenty
instances. At two thousand, with lil-gui firing onChange sixty times a second, it becomes a
slideshow. Worse, every rebuild rerolls the random numbers, so the geometry shimmers while you
drag.
You can’t judge a look that won’t hold still.
So the rule is simple: generate everything at the slider maxima once, then let the sliders decide
what’s visible.
export const MAX_DENSITY = 16;
export const MAX_SHARDS = 16;
Every crystal is stored as its generative parameters, not as a baked matrix. We keep its cluster
position, tangent frame, and a handful of stable random values between 0 and 1:
interface CrystalInstance {
  anchor: THREE.Vector3;  // cluster's anchor-local surface point
  n: THREE.Vector3; t1: THREE.Vector3; t2: THREE.Vector3;
  clusterRnd: number;     // density culling rank
  shardIndex: number;     // shard-count culling rank
  offAz: number; offFrac: number; heightBase: number; jitterRnd: number;
  leanRnd: number; leanAz: number; spin: number;
  hueRnd: number; satRnd: number; clearRnd: number;
  // ...derived cache, rewritten by applySettings()
}
applySettings then recomposes every matrix and colour in place. Culling is just a comparison
against a rank the instance has had since it was created:
const densityFrac = s.clusterDensity / MAX_DENSITY;
inst.visible =
inst.clusterRnd <= densityFrac &&
(inst.kind !== 'shard' || inst.shardIndex < shardCap);
A culled instance gets a zero-scale matrix. It stays in the buffer, stays in the draw call, uses the same memory it did a frame ago, and costs a vertex shader invocation that produces a degenerate triangle. On any GPU made this decade, that’s basically free.
The stable rank is important. Raise the density slider and the same crystals appear in the same order. Existing clusters don’t move. It reads as “more of this” instead of “a completely different thing.” The same idea applies to the clear-quartz mix:
inst.clearRnd < s.clearMix converts the same crystals every time.
The clear/tinted split is basically the same trick one level up. Every crystal owns a slot in two InstancedMesh objects, one using the palette material and one using the clear refractive quartz. Only one of them ever gets a real pose. The other gets a zero-scale matrix.
That means “35% of these should be clear quartz” becomes a slider that switches materials per instance, which instancing normally doesn’t let you do.
Five shape variants multiplied by two material sets gives ten InstancedMesh objects per stroke. A stroke about two-thirds of the way across the sphere generates 537 crystals. At the default slider settings, 119 are visible and the other 418 are sitting in the buffers at zero scale, waiting. Either way, it’s ten draw calls.

Growth is a distance, not a timer
Every mode grows in as the stroke fills. None of them use a tween library, a timeline, or a timer per instance.
There are just two numbers:
birth: the distance along the stroke where an instance was seeded, decided once during
generation.grown: how far the growth front has travelled, advanced bydt * growthSpeedeach frame.
The animation is simply the difference between them:
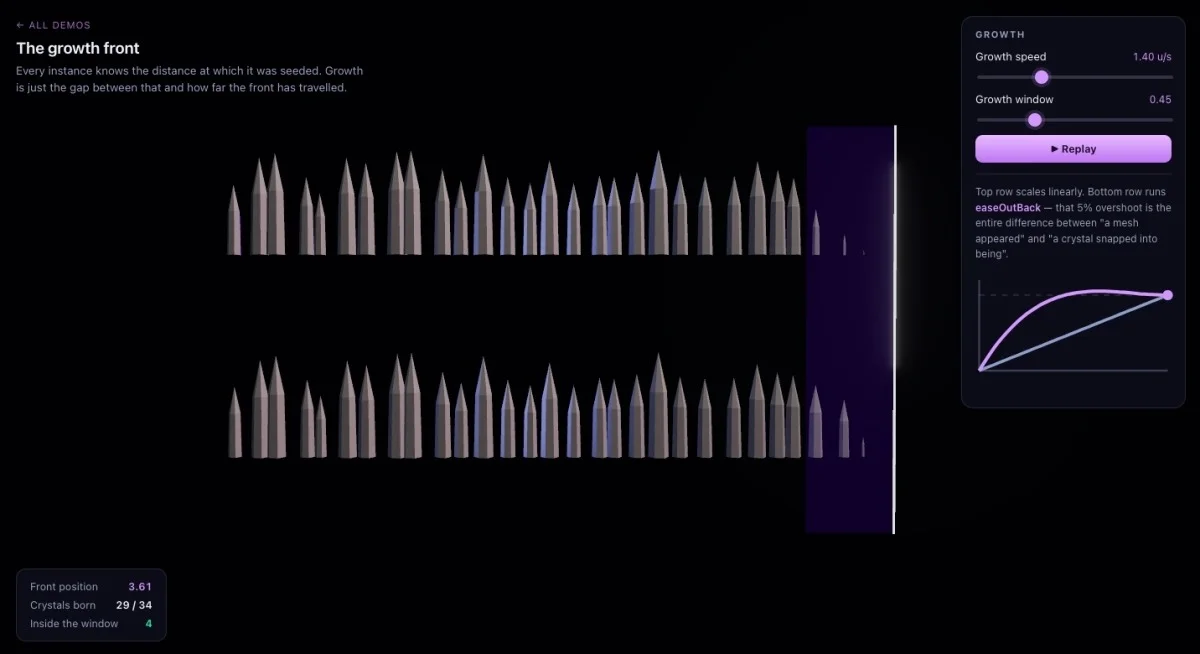
const t = (this.grown - inst.birth) / GROW_WINDOW;
if (t <= 0) continue; // not born yet — matrix stays zero const k = t >= 1 ? 1 : easeOutBack(t);
_s.set(inst.scale.x * k * (0.6 + 0.4 * k), inst.scale.y * k, inst.scale.z * k * (0.6 + 0.4 * k));
_m.compose(inst.pos, inst.quat, _s);
mesh.setMatrixAt(i, _m);
GROW_WINDOW is 0.45 world units, so at any moment the crystals inside a 0.45-unit band behind the front are mid-growth. Everything else is either invisible or finished.
Growth speed is a live slider because it only changes how quickly grown moves. Replaying the animation is grown = 0. Snapping to fully grown is grown = total + window + 1. There’s no state to unwind.
Two details in that snippet do most of the visual work. First is easeOutBack, which overshoots by about 5% before settling. That’s the difference between “a mesh appeared” and “a crystal snapped into being.”
The second is the (0.6 + 0.4 * k) on the width but not the height. Crystals start narrow and then relax outward. That’s roughly how minerals grow and, more importantly here, it stops the animation from looking like a uniform scale-up.
The pose loop also stops updating itself. Once every instance is past t = 1, it sets a done flag and update() returns immediately. A finished stroke costs nothing per frame, so you can cover the sphere without frame time continuing to climb.
Four modes
Crystals: getting glass to read on a dark sphere
The quartz points are hexagonal prisms with a tapered shaft and an off-axis pyramidal termination. They’re built non-indexed so computeVertexNormals() gives genuinely flat facets.
The facets are the whole read. A smooth crystal just looks like a blob.
There are two small geometry details I probably would have skipped if I hadn’t looked closely at photographs. The facet columns are jittered once per column, so the prism edges stay straight from base to tip instead of turning into noise. The base cap also closes to a point slightly below the base plane:
const bottom = new THREE.Vector3(0, -0.02, 0); // tiny below-base apex closes tilted crystalsWithout that, a crystal leaning 30 degrees away from the normal can show a flat, floating hexagon where it meets the surface.
The material took longer than anything else in the project, and the two mistakes I made are worth calling out.
Mistake one: full transmission. Setting transmission: 1 on a crystal sitting on a nearly black sphere gives you a black crystal. It’s obvious in hindsight. Transmission means you see what’s behind the crystal, and what’s behind it is a dark matte ball.
The fix is to keep some diffuse:
mat = new THREE.MeshPhysicalMaterial({
  color: 0xffffff,
  roughness: 0.05,
  transmission: 0.7,     // NOT 1 — full transmission over a dark sphere reads as black glass
  ior: 1.55,
  thickness: 0.4,
  attenuationColor: p.attenuation,
  attenuationDistance: 0.5,
  dispersion: 0.3,       // chromatic fringing inside the glass — the "gem fire"
  iridescence: 0.4,
  clearcoat: 0.5,
  envMapIntensity: 1.6,
});
At 0.7 you still get the glass depth, but about 30% of the surface shades facet by facet. That’s what gives a real amethyst cluster that milky translucence.
Mistake two: tinting twice. My first pass set color to the palette colour and attenuationColor to a darker version of the same colour. The result was dark, muddy, and weirdly opaque because the tint effectively multiplied into itself: once as albedo, then again as absorption.
The base colour is now white. The palette lives in the per-instance colours and in the attenuation, and nowhere else.
Alongside the tinted material, there’s one shared clear-quartz material: transmission: 1, roughness: 0.02, dispersion: 0.4, with a long attenuationDistance of 1.6 so light barely picks up a cast passing through it.
It’s basically a highlight material. A cluster that’s entirely amethyst looks like plastic. Add a few clear crystals and suddenly it starts looking like a mineral.
Molten fissures: a ribbon that has no width
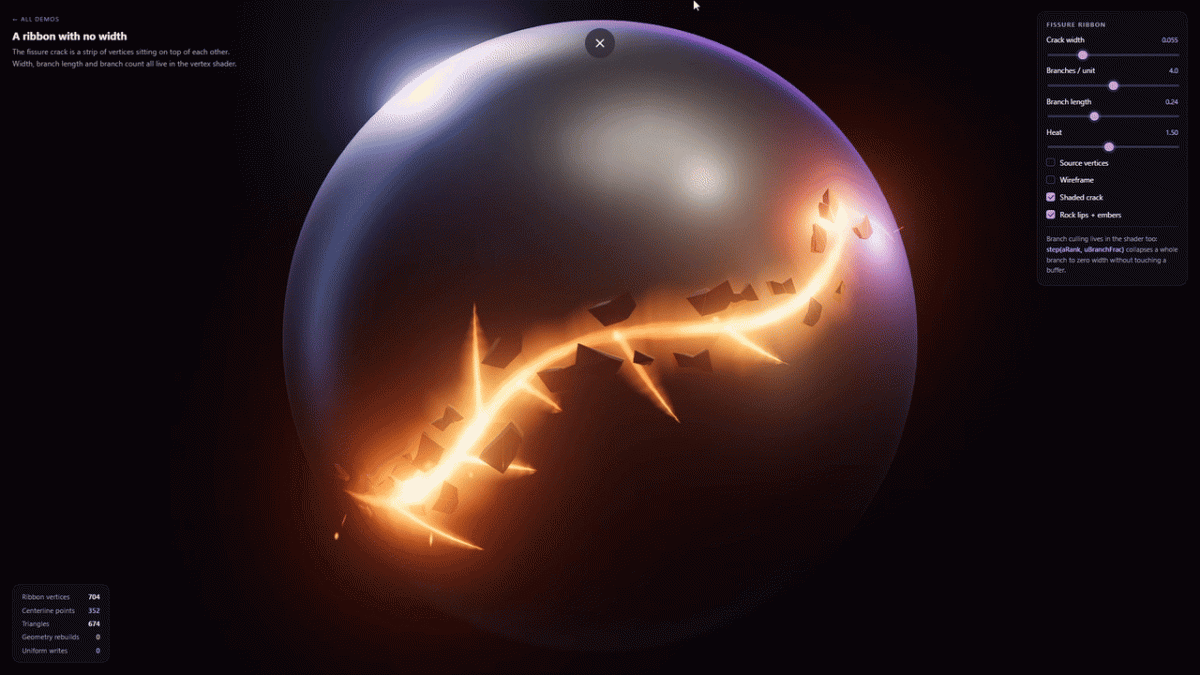
A crack is just a strip of geometry following the stroke. The obvious way to build it is to compute the two edges on the CPU: for every centreline point, push one vertex left by width / 2 and one right.
It works, but it also means changing the width slider requires rebuilding the buffer.
Instead, every vertex stays on the centreline. Both vertices start at exactly the same position, and the strip gets pushed apart in the vertex stage:
mat.positionNode = positionLocal.add(
  aSide.mul(this.uWidth.mul(0.5).mul(aAcross).mul(aJit)).mul(taper.mul(sel)),
);
aAcross is ±1, aSide is the per-point across direction, and aJit is a baked-in random walk that gives the crack an organic, uneven width. uWidth is just a uniform.
So the crack width slider writes one float and doesn’t touch the buffers.
A typical crack with its branches has 352 centreline points, which means 704 vertices and 674 triangles. Every one of those vertices has a twin sitting at exactly the same coordinates until the vertex shader runs.
Once width is in the shader, the rest follows naturally. Branches are generated once as lightning-like walks that step across the surface, veer, and re-project onto the sphere. Each branch carries three extra attributes: aRank, a random 0–1 value; aWalk, the distance from the branch origin; and aMaxWalk.
const sel = step(aRank, this.uBranchFrac);              // branch density
const taper = float(1)
  .sub(aWalk.div(aMaxWalk.mul(this.uLenFrac).add(1e-4)))
  .clamp(0, 1)
  .pow(0.7);                                            // branch length
sel is 1 for branches that survive the density slider and 0 for the rest. A culled branch gets multiplied down to zero width, so it collapses back into the centreline and disappears.
The main crack has rank 0, so it always survives. taper pinches a branch to a point wherever the length slider currently ends.
Two sliders, two uniforms, zero rebuilds, and no CPU work per frame.
The colour of the crack is controlled by one float. There’s no texture and no light touching it. Heat is the product of four terms, followed by a ramp:
const openness = smoothstep(0.0, 0.1, this.uGrown.sub(aDist));
const center = smoothstep(0.12, 1.0, abs(aAcross)).oneMinus();
const pulse = aDist.mul(7).sub(time.mul(this.uPulse.mul(2.6))).sin().mul(0.28).add(0.72);
const flicker = time.mul(9).add(aDist.mul(41)).sin().mul(0.08).add(0.94);
const flash = smoothstep(0.0, 0.22, abs(this.uGrown.sub(aDist))).oneMinus().mul(1.6).mul(tip);

const heat = center.mul(pulse).mul(flicker).mul(this.uHeat)
  .mul(taper.mul(0.35).add(0.65))
  .mul(tip.mul(0.85).add(0.15))
  .add(flash);

const cSeam = vec3(0.02, 0.004, 0.002);
const cRed = vec3(1.1, 0.1, 0.01);
const cOrange = vec3(2.6, 0.85, 0.1);
const cWhite = vec3(4.6, 3.6, 2.4);
let color = mix(cSeam, cRed, smoothstep(0.0, 0.55, heat));
color = mix(color, cOrange, smoothstep(0.55, 1.15, heat));
color = mix(color, cWhite, smoothstep(1.15, 2.1, heat));
Each term has one job. center controls the cross-section: bright at the seam and gone at the edges. pulse is the wave travelling along the crack, which makes it breathe. flicker adds high-frequency variation so the light never looks completely still. flash is the white-hot band travelling with the propagation front, and it’s the part that makes the crack look like it’s tearing rather than simply fading in.
The ramp colours are deliberately way above 1. cWhite is (4.6, 3.6, 2.4), which gets clipped to white by ACES tone mapping and, more importantly, goes straight past the bloom threshold.
The glow isn’t some post-processing trick applied to the crack. The crack is genuinely that bright, and bloom is just reporting it.
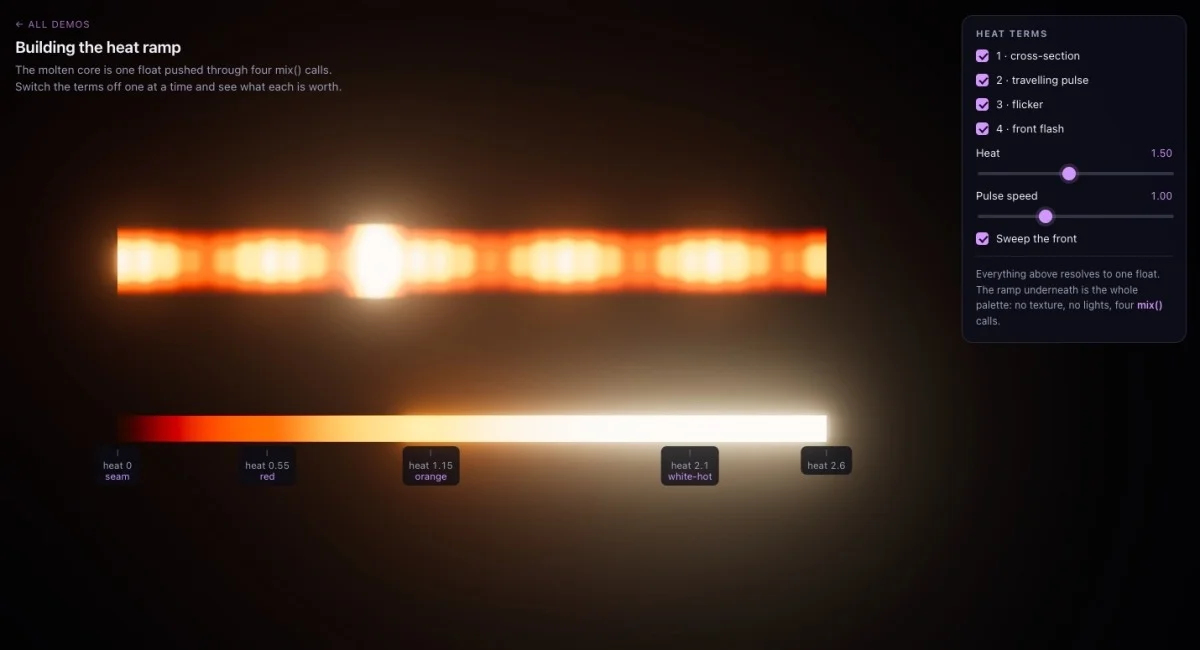
The crack also uses AdditiveBlending, and that’s more than just a glow choice. When two fissures cross, or a branch meets its parent, their light adds together into a hotter junction instead of one crack simply painting over the other.
It’s the kind of effect you get for free from the right blend mode and would otherwise spend a day trying to fake.
Aurora silk: light the folds, not the sheet
The aurora curtain is a grid built along the stroke, with every vertex initially sitting at the hem. Height and billow are applied in the vertex stage.
That’s the same reasoning as the crack ribbon, so curtain height can stay a live uniform:
const foldPhase = aDist.mul(6.3).add(T.mul(1.1)).add(phase);
const sway = foldPhase.sin()
  .add(aDist.mul(11.7).sub(T.mul(0.7)).add(aV.mul(1.8)).add(phase).sin().mul(0.5));
const amp = this.uWave.mul(0.17).mul(aV.pow(1.35)).mul(unfurl).mul(breath);

mat.positionNode = positionLocal
  .add(aUp.mul(lift.add(ripple.mul(0.4))))
  .add(aSide.mul(amp.mul(sway).add(ripple)));
The amplitude scales with aV^1.35, which is the height fraction. That keeps the hem pinned to the surface while the crest billows. Without it, the entire sheet slides around like a flag that came off its pole.
But the vertex wave by itself only gives you a wobbling plane, not fabric. The thing that sells it is one line in the fragment stage:
const folds = abs(cos(foldPhase)).pow(1.6).mul(0.85).add(0.4);The same foldPhase that moves the vertices now controls the brightness. Where the cloth turns away from you, where you’d effectively be looking through more of it, it glows.
Because both stages use the same phase, the bright bands travel with the folds instead of sliding across them.
That’s real behaviour: translucent fabric seen edge-on is brighter. An aurora is basically a curtain that you’re looking at from the side.
I keep coming back to this one because it has probably the highest ratio of visual payoff to characters typed in the whole project. One shared variable between two shader stages.
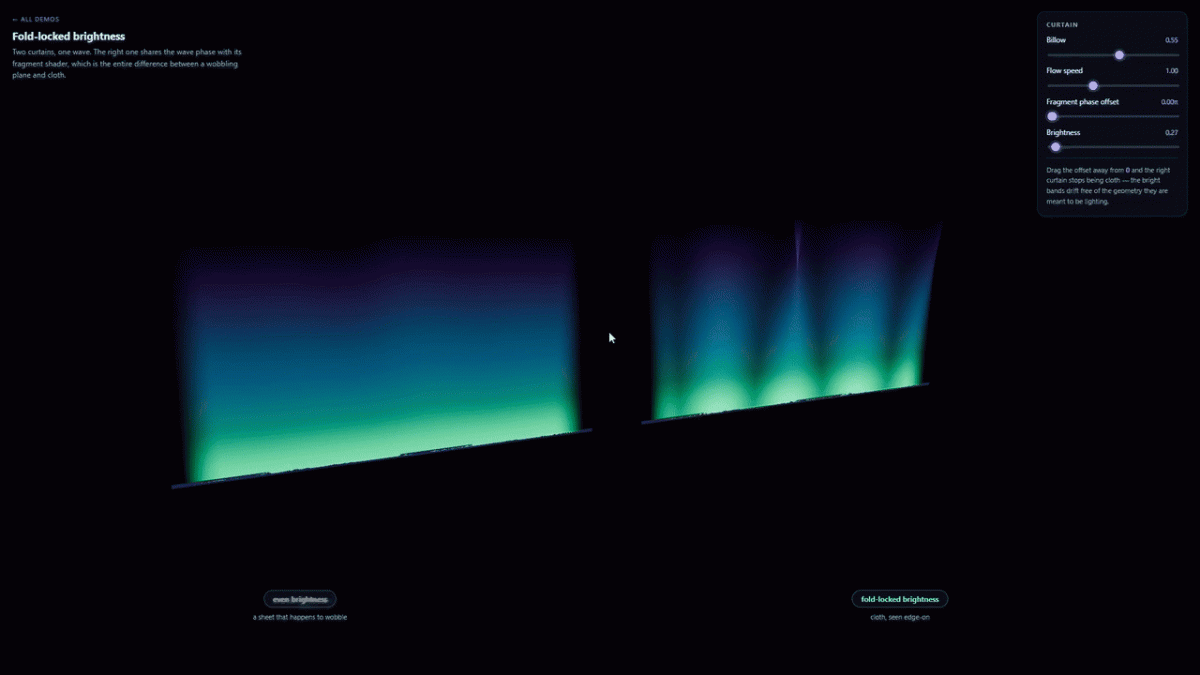
Two curtains use the same geometry but different phases and heights. There’s a front sheet and a shorter, dimmer back sheet. Together they read as separate bands of one aurora rather than a single flat plane.
It’s about the cheapest depth cue you’ll ever buy: one extra draw call and one changed constant.
The reef: one heartbeat for the whole thing
The bioluminescent reef is the most conventional geometry in the project: recursively branched staghorn corals, anemone tendrils, and canvas-drawn gorgonian fans.
It’s also the mode with the least conventional lighting logic.
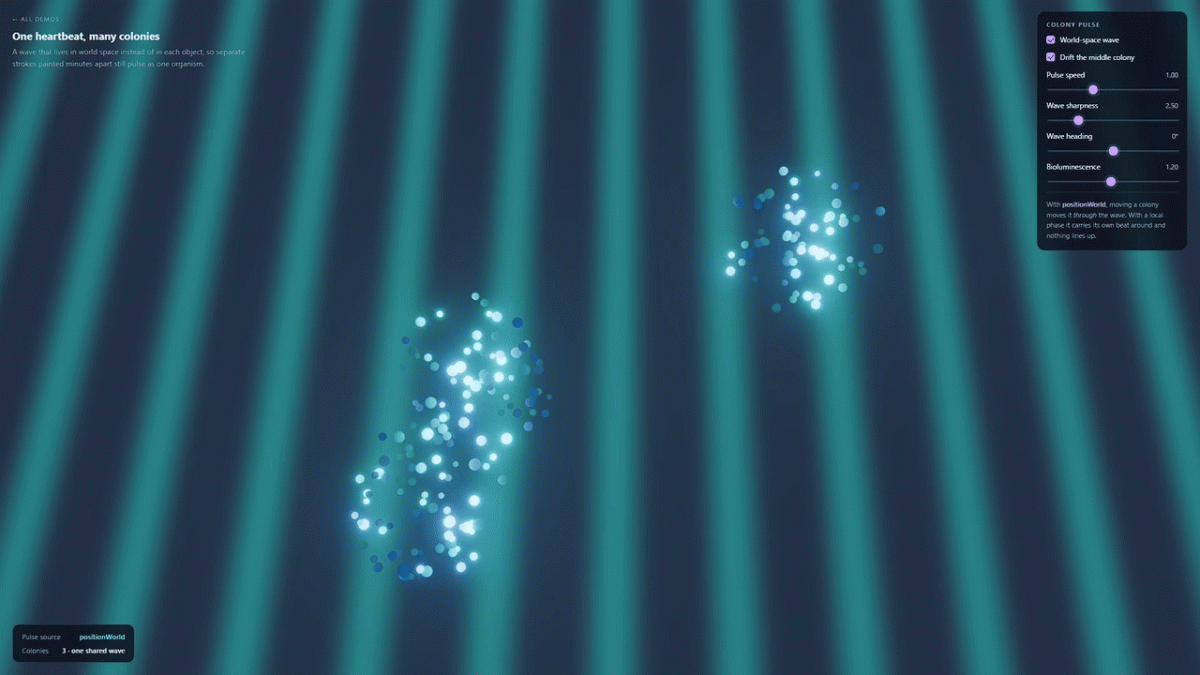
The polyps don’t blink on their own clocks. Their brightness comes from a wave that lives in world space:
function colonyPulse() {
  return positionWorld.dot(vec3(1.6, 1.1, 1.35)).mul(2.6)
    .sub(time.mul(uPulse.mul(2.1)))
    .sin().mul(0.5).add(0.5).pow(2.5);
}
Project the world position onto a direction, subtract time, take the sine, then sharpen it with a pow. The result is a plane wave sweeping through the scene, and every polyp, tendril tip, and fan vein in every stroke samples that same wave.
The interesting part is what happens next. Paint one colony on the left side of the sphere and another on the right five minutes later, and they still pulse in the right order. The wave reaches one and then the other, with the delay you’d expect from the distance between them.
Nobody explicitly wired that up. It falls out of sampling a shared field instead of giving every object its own phase.
Each polyp also gets a small per-instance blink from hash(instanceIndex), so the reef feels like one organism made from individually twitchy parts.
The pow(2.5) is doing some quiet work here too. It turns the lazy round hump of a sine wave into a sharper crest with longer dark troughs. Bioluminescence feels more like a flash with a slow recovery than a dimmer being smoothly turned up and down.
The look
The environment is the lighting
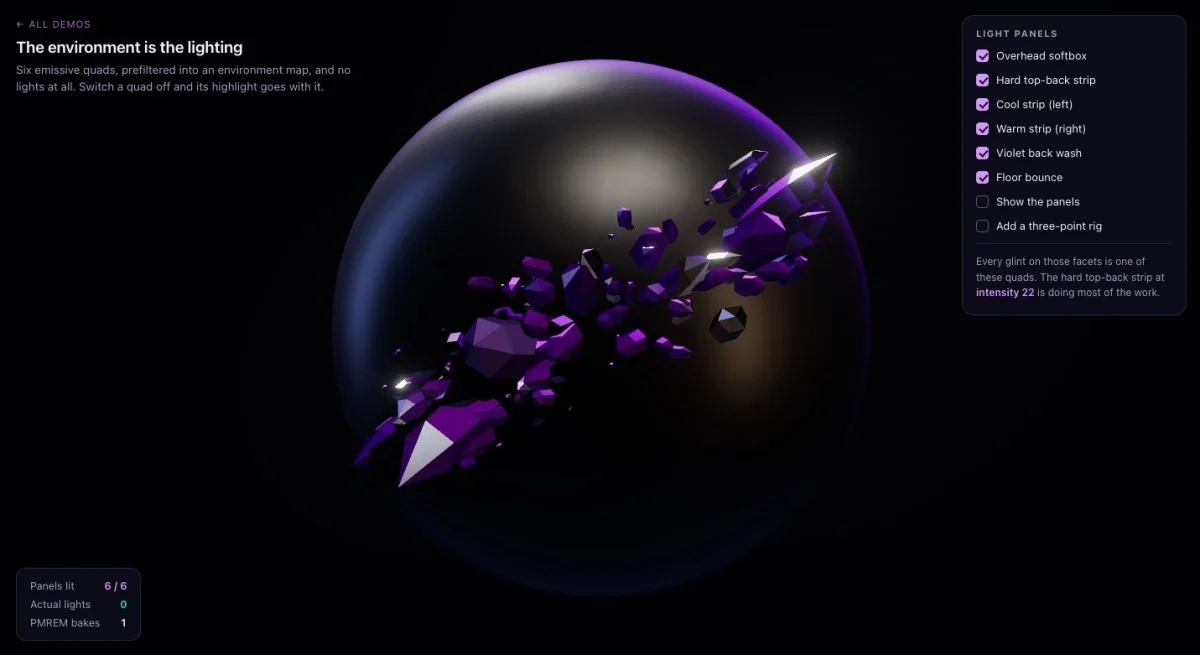
Crystals are mostly reflection. Almost everything you see on them isn’t really shading. It’s a picture of the room. So the room is the thing worth building, and it’s just six emissive quads:
panel(0xfff6ea, 9, 4.5, 3, [1.5, 8, 2]);      // overhead softbox, biased toward camera
panel(0xffffff, 22, 0.7, 4.5, [-2.5, 5, -6]); // hard top-back strip — facet glints
panel(0x9db8ff, 5, 1.2, 7, [-7, 2, -2]);      // cool strip, camera-left
panel(0xffd9b0, 3.5, 1.6, 5, [6, 1.5, 3]);    // warm strip, camera-right
panel(0x8a5cff, 4, 6, 3.5, [0, 2.5, -8]);     // violet wash behind the subject
panel(0x2e3c58, 1.2, 9, 9, [0, -5, 0]);       // dim floor bounce

const pmrem = new THREE.PMREMGenerator(this.renderer);
this.scene.environment = pmrem.fromScene(env, 0.04).texture;
MeshBasicMaterial with a colour pushed past 1, prefiltered by PMREMGenerator. That’s basically the whole studio.
The intensities aren’t arbitrary. That 22 on the narrow top-back strip is what produces the hard specular glints along the crystal facet edges. It needs to be that bright because the strip is only 0.7 units wide and mostly misses the crystals.
If you’ve ever lit a product shot, this should all feel familiar: big soft key, hard rim, cool/warm separation, and a wash behind the subject to lift it away from the background.
The three actual lights in the scene do a different job. The key spot casts the soft shadow under the floating sphere. The rear pair, a blue-ish directional and a violet kicker, exist because transmission responds to light arriving from behind the surface.
They’re what make the crystals light up from inside.
That’s also why “backlight” is a slider in the UI while “key light” isn’t.
Post-processing
Post-processing is the final pass over the rendered scene: this is where the image gets its bloom, vignette, anti-aliasing, and tone mapping.
Four things, in one node graph:
const scenePass = pass(this.scene, this.camera, { samples: 4 });
const color = scenePass.getTextureNode();
this.bloomNode = bloom(color, this.settings.bloomStrength, 0.6, this.settings.bloomThreshold);
const vignette = float(1).sub(smoothstep(0.5, 0.92, screenUV.distance(vec2(0.5, 0.5))).mul(0.35));
this.post.outputNode = color.add(this.bloomNode).mul(vignette);
MSAA at four samples on the scene pass, bloom picking up anything above the threshold, a 35% vignette into the corners, and ACES filmic tone mapping on output.
The vignette is probably the cheapest “this was shot with a fast lens” signal there is. I’d put it on everything if I could.
Refinement
The one place a rebuild is unavoidable
Reseeding genuinely regenerates the geometry. New random numbers mean new geometry, so there’s no way around that.
A few settings on some modes also can’t be re-derived in place, which is what the optionalapplySettings? is for. That leaves us with one rebuild path, and it’s throttled adaptively:
const interval = this.regrowPending.mode === 'animate'
  ? 0
  : THREE.MathUtils.clamp(this.regrowCost * 3, 60, 400);
if (now - this.lastRegrowAt >= interval) {
  const t0 = performance.now();
  this.regrow(req.mode === 'animate');
  this.regrowCost = performance.now() - t0;   // measure, then back off proportionally
  this.lastRegrowAt = performance.now();
}
Requests get coalesced into a single pending flag and serviced during the tick. The interval is then based on how long the last rebuild actually took.
An empty scene rebuilds every 60ms and feels instant. A sphere covered in reef colonies backs off toward 400ms and stays draggable.
It adapts to the machine as well as to the scene, which is a lot better than picking some constant and hoping it works everywhere.
Two WebGPU things that will catch you
Points are one pixel. PointsMaterial with size: 0.02 and sizeAttenuation: true renders as a single pixel per point under the WebGPU backend. Point primitives simply don’t have a size there.
The embers, plankton, and star motes in this project are all instanced quads with a soft radial sprite. They don’t even billboard. Each one gets a fixed random orientation when it spawns, which looks completely fine for a spark and saves updating a rotation every frame for hundreds of particles.
Line width is ignored. Same story. The violet trail following the cursor started as a Line with linewidth: 3. It stayed that way for about ten minutes before I noticed it was basically a hairline.
It’s now an InstancedMesh made from overlapping spheres. One bead per sample, with a radius chosen so consecutive beads overlap enough to look like one continuous stroke:
this.beads = new THREE.InstancedMesh(
  new THREE.SphereGeometry(STROKE_RADIUS, 12, 8), glow({ opacity: 1 }), MAX_BEADS,
);
for (let i = 0; i < MAX_BEADS; i++) this.beads.setMatrixAt(i, this.zeroMat);
this.beads.count = 0;
The pre-zeroing of the whole buffer is worth pointing out. Instance matrices are otherwise uninitialised garbage. Raise count halfway through a stroke and you can suddenly draw a unit-scale sphere at the origin from whatever happened to be left in memory.
Zero the buffer once during construction, and that entire class of bug disappears.
Wrapping up
The thing I’d take from this project into the next one isn’t a shader. It’s the constraint.
“No allocation while a slider is moving” sounded like a performance rule when I first wrote it down. It turned out to be a design rule.
It forced every mode into a shape where its look is just a function of stable per-instance random values and the current settings. Once you’re working that way, live editing, deterministic replay, seed-based variation, and undo stop feeling like separate features you have to implement.
They just become things that are true.
A few things are worth trying if you clone it:
- Write a mode. Implement
createStrokeand add one line to the registry. Mushrooms, circuitry, frost, feathers, fungal networks. The samples don’t care. - Swap the canvas. Nothing in the painting code knows it’s a sphere. Load a mesh, run
indexForRaycastson it, and most things should keep working. The one exception is the fissure branch walker, which currently re-projects onto a sphere with radius|origin|and would need a proper surface walk for arbitrary geometry. - Push the pulse further. The reef’s world-space wave is a useful template. A shared field that every mode samples, whether that’s wind, tide, or a moving light source, could tie four unrelated effects into one world with about thirty lines.
Credits
- Built with three.js (WebGPU renderer + TSL), three-mesh-bvh for accelerated picking, and lil-gui.
- Growth easing is a variant of the standard
easeOutBackfrom easings.net. - The random generator is Tommy Ettinger’s mulberry32.
- The lighting approach is borrowed wholesale from product photography, which is a much older field than ours and has already solved most of it.
Work with me
If you’re building something that needs to look as good as it works, I’d love to hear about it.
I run Chiro Studio, an award-winning 3D visualization and animation studio focused on cinematic CGI, architectural visualization, product films, and real-time experiences. I work with brands, architecture firms, and tech companies to turn ideas, spaces, and products into visuals that feel tangible before they exist.
If you have a project in mind, a product that needs a film, an environment that needs bringing to life, or just an idea you want to push somewhere visually interesting, get in touch.