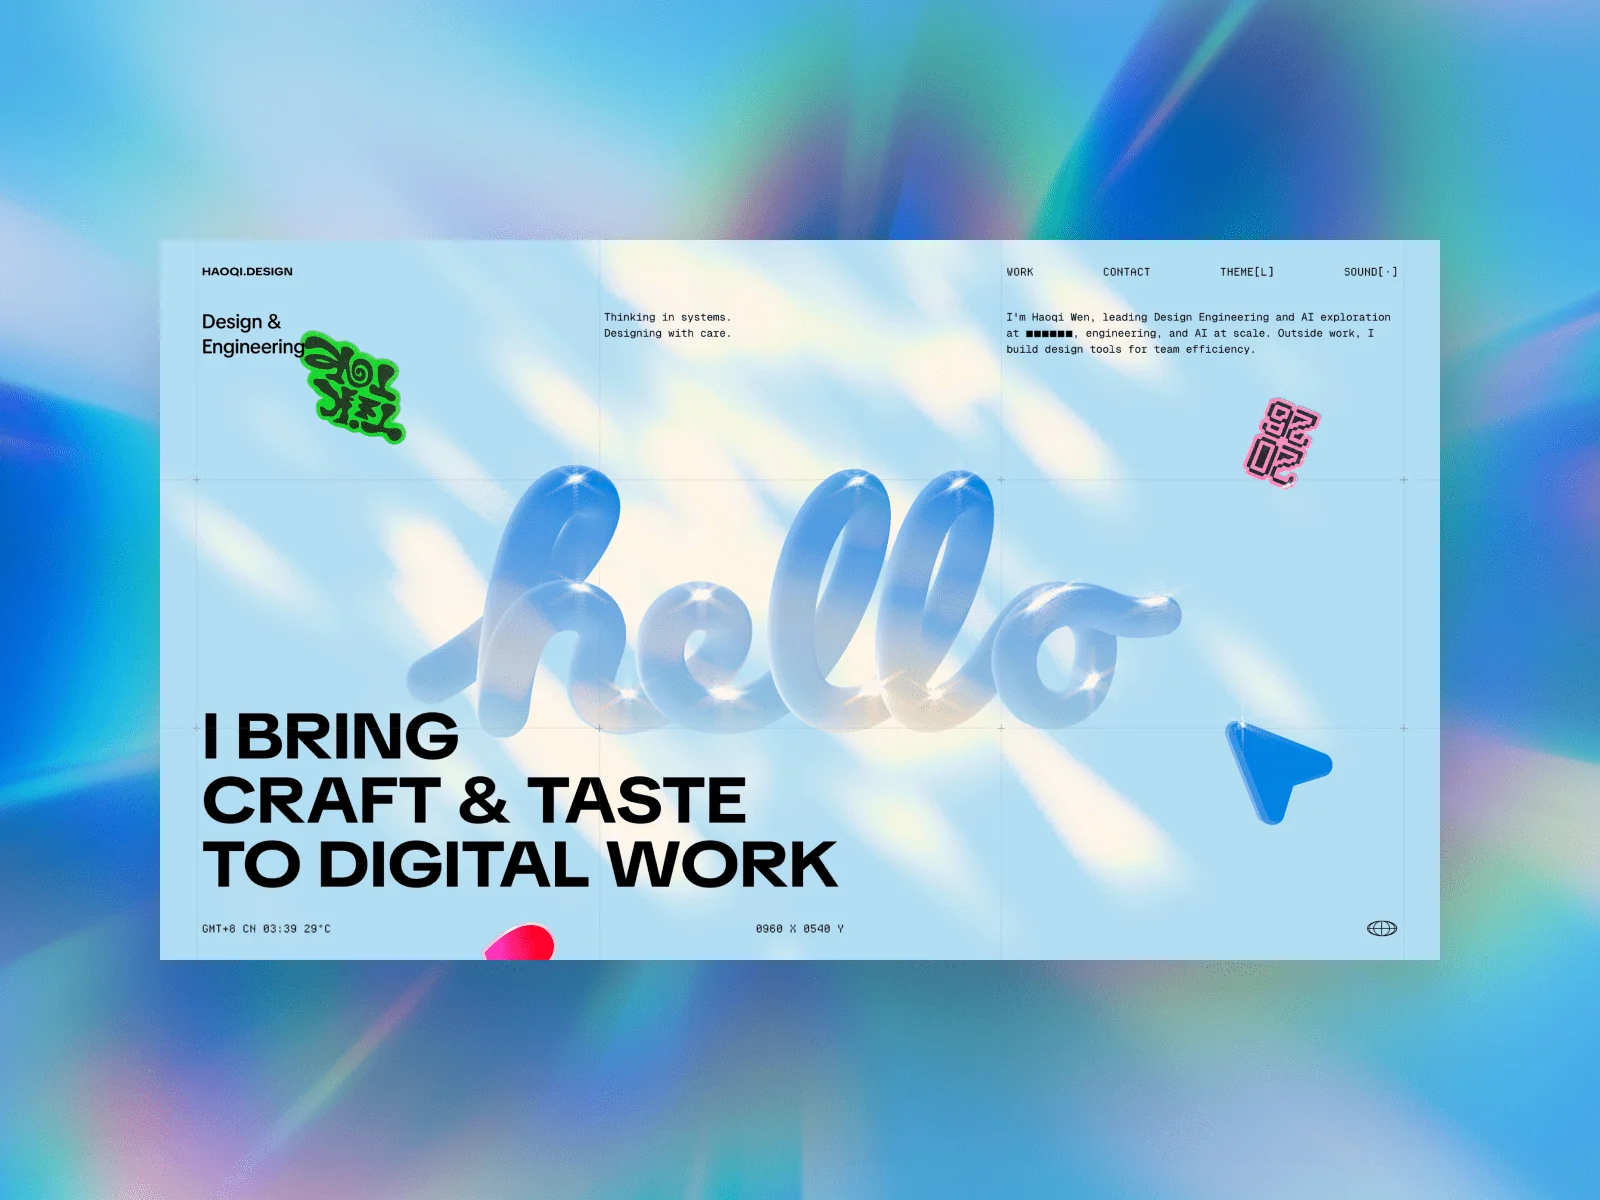
As a child, I first saw the iMac G3 in an art book. Its translucent shell and distinctive interface made me notice the visual design of digital products long before I knew what that field was called. Apple’s hello (again) campaign stayed with me too, and became one of the starting points for this site.
Today I work across design systems and design engineering. Frontend development began as a way to realize my designs, then gradually became part of the work itself. I update my personal site every so often to collect what I have been thinking about and making. It is an index of my work, but also a design and development project in its own right.
This version came together over about three to five months, in bits of spare time. During the previous two years, I had been using AI as a way to learn more about shaders and Three.js. This time, I wanted to bring that knowledge into one coherent experience instead of presenting a collection of isolated effects. The visual direction grew around hello, glass, colored light, and retro-futurism. The central technical question was how to give DOM and WebGL distinct jobs while keeping them together through scroll and interaction.
Technical Overview
- Next.js + React
- Lenis
- Motion
- Three.js / React Three Fiber / Drei
- Custom shaders / post-processing
- Spline for 3D models
- Figma for drawing stickers
1. Keeping DOM and WebGL on the Same Frame
One scroll source for DOM and WebGL
The site scrolls vertically in the usual way. I wanted DOM to handle text and typography, while a fixed canvas carries the glass model and image effects. Scrolling naturally moves the DOM, so the first task was to make every object in the canvas follow the same position.
In the first version, Lenis updated the DOM while R3F read window.scrollY inside useFrame and updated WebGL. It looked fine at low speeds, but a fast scroll revealed a consistent one-frame delay in WebGL. The reason was that Lenis and R3F each owned a requestAnimationFrame loop. If R3F ran first, it read the previous scroll value. Lenis would only advance afterwards and move the DOM for the current frame. A custom scroll container made the mismatch more obvious because window.scrollY was not necessarily the value Lenis was maintaining. No amount of interpolation tuning could solve a problem caused by execution order and an unreliable data source.
After looking at Lenis’ manual raf approach and JOYCO’s WebGL Scroll Sync, I moved scrolling and rendering into one frame loop. Lenis’ own loop is disabled. R3F calls lenis.raf through addEffect, then a ScrollBus records Lenis’ scroll value for that frame. Every later useFrame consumer reads the same snapshot. DOM and WebGL now agree on both the data and the moment it becomes current.
// scroll_root.tsx
function ScrollShell({ children }: { children: React.ReactNode }) {
  return (
    <ReactLenis options={{ /* ... */, autoRaf: false }}>
      <LenisScrollEnvBridge />
      {children}
    </ReactLenis>
  )
}

function LenisScrollEnvBridge() {
  const lenis = useLenis()

  useEffect(() => {
    bindLenisScrollBus(lenis ?? null)
    return () => bindLenisScrollBus(null)
  }, [lenis])

  useEffect(() => {
    if (!lenis) return
    return addEffect((time: number) => {
      lenis.raf(time)
    })
  }, [lenis])

  return null
}
Once lenis.raf advances the scroll, Lenis emits its scroll event and updates the ScrollBus in the same frame. WebGL components that run afterwards can read the fresh snapshot directly.
// lenis_scroll_bus.ts
import type Lenis from "lenis"

// The production snapshot also includes limit, progress, velocity,
// direction, and viewportHeight.
type ScrollSnapshot = { scrollTop: number }

let snapshot: ScrollSnapshot = { scrollTop: 0 }
const listeners = new Set<() => void>()
let unbind: (() => void) | null = null

export const bindLenisScrollBus = (lenis: Lenis | null) => {
  unbind?.()
  unbind = null
  if (!lenis) return

  const onScroll = ({ scroll }: { scroll: number }) => {
    snapshot = { scrollTop: scroll }
    for (const listener of listeners) listener()
  }

  lenis.on("scroll", onScroll)
  unbind = () => lenis.off("scroll", onScroll)
  snapshot = { scrollTop: lenis.scroll }
}

export const getLenisScrollSnapshot = () => snapshot
export const subscribeLenisScroll = (listener: () => void) => {
  listeners.add(listener)
  return () => listeners.delete(listener)
}
WebGL already runs frame by frame, so it can simply read the latest value. React components that need scroll state for DOM output subscribe through useSyncExternalStore. The rest of the component tree stays untouched.
// WebGL reads during useFrame without triggering React renders.
const scrollY = getLenisScrollSnapshot().scrollTop

// React subscribes only where the value affects DOM output.
const SERVER_SCROLL_SNAPSHOT = { scrollTop: 0 }
const scroll = useSyncExternalStore(
  subscribeLenisScroll,
  getLenisScrollSnapshot,
  () => SERVER_SCROLL_SNAPSHOT,
)
In the side-by-side demo, the left keeps the two independent loops while the right uses the shared frame loop and ScrollBus. The one-frame slip disappears on the right, even during a fast scroll.
One pointer coordinate system for every effect
When interaction stays inside a canvas, R3F’s normalized state.pointer is usually enough. On this site, the same pointer also drives DOM coordinate readouts, camera parallax, the glass rim light, and a fluid effect. Earlier versions let each feature listen for pointer input on its own. They worked, but every new effect had to repeat the same coordinate conversion, Y-axis inversion, and leave-state handling. The input path grew more fragmented with every addition.
I reused the ScrollBus idea and built a global PointerBus. It converts browser coordinates into a 0-to-1 UV once, and keeps an inside flag to say whether the pointer is still in the window. When the pointer leaves, the page loses focus, or the tab becomes hidden, the UV returns to the center. Effects can settle back to their initial state instead of jumping from a stale coordinate when the pointer comes back.
A single write updates both a mutable Vector2 for WebGL and an immutable snapshot for React. Anything new can consume the PointerBus without adding another listener or inventing its own coordinate rules.
type PointerSnapshot = {
  x: number
  y: number
  inside: boolean
}

// One write keeps DOM and WebGL on the same x / y / inside state.
const updatePointer = (next: PointerSnapshot) => {
  snapshotRef.current = next      // React snapshot
  uv.set(next.x, next.y)          // WebGL
  insideRef.current = next.inside // WebGL
  scheduleNotify()                // React, at most once per frame
}
With scroll and pointer input unified, I first put the system to work on the project grid. It holds the site’s main content and has the most overlap between DOM layout and WebGL effects, which made it a useful test for the whole hybrid approach.
2. DOM for Layout, WebGL for the Unexpected
Unlike the hero, the project list needs to be easy to read and browse before it does anything else. I did not want to sacrifice the work for an effect, but I also did not want another familiar image grid. DOM and CSS Grid therefore own the structure, responsive behavior, and accessibility. Transparent image placeholders are measured and mirrored into the canvas, where WebGL steps in only for states that would be awkward to create with regular DOM. The experience also does not ask visitors to enable a browser flag for the experimental HTML-in-Canvas API.
Mirroring a DOM grid in WebGL
Each project image keeps a transparent DOM placeholder with a ref. CSS Grid decides its position and dimensions. The browser’s Element.getBoundingClientRect() gives me that rectangle, but the production site does not ask every card to read layout on every frame. One sampler maintains a shared rectangle cache instead.
During a scroll, the sampler first corrects cached rectangles by the scroll delta. Cards near the viewport are measured every frame so they remain aligned after a layout change. Distant cards refresh once every 12 frames, staggered across the list, which avoids bunching all DOM reads into the same frame.
// Simplified DomTargetRectSampler.
useFrame(() => {
  const rects = targetRectMapRef.current
  const scrollTop = getScrollTop()
  const deltaY = scrollTop - lastScrollTop
  lastScrollTop = scrollTop

  // Scroll moves cached viewport rects without another layout read.
  for (const rect of Object.values(rects)) {
    rect.top -= deltaY
    rect.bottom -= deltaY
  }

  layers.forEach((layer, index) => {
    const previous = rects[layer.key]
    const nearViewport = !previous || isNearViewport(previous)
    const staggeredRefresh = frame % 12 === index % 12
    if (!nearViewport && !staggeredRefresh) return

    const element = layer.targetRef.current
    if (element) updateCachedRect(layer.key, element.getBoundingClientRect())
  })

  frame += 1
}, -3)
The sampler runs before the image components, so a nearby image reads a freshly measured DOM rectangle in the same frame. The cache lives in a ref map and never causes a React render. A mesh hides and stops updating when its texture is not ready, its rectangle is invalid, or the image is far outside the viewport. Its reveal progress also resets offscreen, so it is ready when the card returns.
I use one fullscreen mesh per image to keep the coordinate math simple. Rather than moving 3D geometry to match the DOM, I write the rectangle’s position and size into uRect. The shader turns screen UV into card-local coordinates, keeping the canvas image aligned with its placeholder. Fullscreen meshes do add overdraw, so only images near the viewport are rendered.
// dom_sync.frag.glsl
uniform vec4 uRect; // xy origin, zw size
uniform sampler2D map;

vec4 sampleDomImage(vec2 screenUv) {
  vec2 localUv = (screenUv - uRect.xy) / uRect.zw;
  vec2 edge = min(localUv, 1.0 - localUv);
  float inside = step(0.0, edge.x) * step(0.0, edge.y);
  vec4 color = texture2D(map, clamp(localUv, 0.0, 1.0));
  color.a *= inside;
  return color;
}
Writing uRect only requires one coordinate-system correction. Screen coordinates begin at the top left, while shader UV begins at the bottom left, so Y has to be flipped. After that, CSS remains free to change columns, gaps, and card ratios. WebGL only follows the resulting rectangles.
The unexpected starts on hover
I wanted each project card to hold more visual information, so every card has two images. A plain crossfade still felt too familiar. Instead, the shader divides the screen into a fixed grid. The reveal spreads from the center of the card while a square grows inside each cell, gradually uncovering the second image. This dot-matrix language later found its way into loading, page transitions, and the mobile menu.
The shader does the work in three steps. First, uRect transforms fullscreen UV into local card UV so both images match the same DOM placeholder. Next, screen space is divided into fixed-size cells. Finally, the card’s aspect ratio is compensated for while hover progress expands a circular region from the center. Inside that region, each cell’s square grows. The resulting mask blends the two textures.
// Inputs shared by both images.
uniform sampler2D map;
uniform sampler2D mapHover;
uniform vec4 uRect;
uniform float uHoverRevealProgress;
uniform float uDotPixelSize;
uniform vec2 uViewportPx;

vec4 revealHoverImage(vec2 screenUv) {
  // 1. Map the full-screen UV into the DOM card.
  vec2 localUv = (screenUv - uRect.xy) / uRect.zw;
  float rectWidthPx = max(uRect.z * uViewportPx.x, 1.0);
  float rectHeightPx = max(uRect.w * uViewportPx.y, 1.0);

  // 2. Divide screen space into fixed-size cells.
  vec2 viewportPx = max(uViewportPx, vec2(1.0));
  vec2 cellSizeUv = vec2(max(2.0, uDotPixelSize)) / viewportPx;
  vec2 cellUv = fract(screenUv / cellSizeUv);
  float squareDist = max(abs(cellUv.x - 0.5), abs(cellUv.y - 0.5));

  // 3. Expand from the card center and grow a square in each cell.
  float rectAspect = rectWidthPx / rectHeightPx;
  vec2 centered = localUv * 2.0 - 1.0;
  centered.x *= rectAspect;
  float distToCenter = length(centered);
  float maxRadius = length(vec2(rectAspect, 1.0));
  float progress = clamp(uHoverRevealProgress, 0.0, 1.0);
  float radius = progress * (maxRadius + 0.12);
  float grow = 1.0 - smoothstep(radius - 0.12, radius + 0.12, distToCenter);
  grow *= step(0.0001, progress);

  float squareExtent = mix(0.0, 0.5, grow);
  float squareAa = max(fwidth(squareDist), 0.0001);
  float squareMask = 1.0 - smoothstep(
    squareExtent - squareAa,
    squareExtent + squareAa,
    squareDist
  );

  // Mix the aligned textures with the generated mask.
  vec4 baseColor = texture2D(map, clamp(localUv, 0.0, 1.0));
  vec4 hoverColor = texture2D(mapHover, clamp(localUv, 0.0, 1.0));
  vec4 color = mix(baseColor, hoverColor, squareMask);
  vec2 edge = min(localUv, 1.0 - localUv);
  color.a *= step(0.0, edge.x) * step(0.0, edge.y);

  return color;
}
Developing the image as it enters the frame
This idea came from a photographer’s website I once saw. The shift from a negative back to full color felt right as an image entrance, so I brought it into the project grid. Once a card enters the viewport, its image develops over 0.8 seconds. The progress returns to zero when the card leaves completely, ready to play again on its next visit. With prefers-reduced-motion enabled, the transition is skipped and the original color appears immediately.
uniform float uPolarityPositive; // 0 = negative, 1 = original

// Blend from the negative image back to its original color.
vec3 applyPolarity(vec3 rgb) {
  float t = clamp(uPolarityPositive, 0.0, 1.0);
  return mix(1.0 - rgb, rgb, t);
}
Making scroll speed visible with a shader
After hover and the entrance effect were in place, I wanted one last WebGL behavior for the grid. Fast scrolling should feel faster. The distance travelled between two frames, divided by time, gives me velocity. I normalize it into uCurlStrength, so the images flex slightly along the horizontal axis in response to speed rather than accumulating distortion with scroll distance.
Trackpads introduce a lot of small velocity fluctuations. To keep them from turning into visual noise, the strength uses two time constants with a fast attack and a slower release. delta is clamped as well, preventing an extreme value when a backgrounded page wakes up.
// dom_sync_img.tsx
function createCurlStrengthSampler() {
  let previousScrollY: number | null = null
  let activity = 0

  return (scrollY: number, delta: number) => {
    const dt = THREE.MathUtils.clamp(delta, 1 / 240, 0.1)
    const velocity = previousScrollY == null
      ? 0
      : Math.abs(scrollY - previousScrollY) / dt
    previousScrollY = scrollY

    // Normalize scroll speed into the target curl activity.
    const target = THREE.MathUtils.clamp(velocity / 800, 0, 1)

    // Fast attack and slow release smooth small trackpad fluctuations.
    const tau = target > activity ? 0.025 : 0.175
    const alpha = 1 - Math.exp(-dt / tau)
    activity += (target - activity) * alpha

    // Map the smoothed activity to the maximum curl strength.
    return 0.06 * activity
  }
}
The sampler keeps the previous scroll position and current strength between frames. That memory is what makes an ongoing velocity measurement and its smoothing possible. In the shader, a semicircular profile controls the horizontal UV compression. The middle of the image moves very little, while the top and bottom bend further as uCurlStrength rises.
// dom_sync.frag.glsl
uniform float uCurlStrength;

vec2 applyCurl(vec2 screenUv) {
  float centered = 2.0 * screenUv.y - 1.0;
  float profile = 1.0 - sqrt(max(0.0, 1.0 - centered * centered));

  // Higher speed increases uCurlStrength and compresses X near the top and bottom.
  float uvScale = 1.0 - profile * uCurlStrength;
  float distortedX = (screenUv.x - 0.5) * uvScale + 0.5;
  return vec2(distortedX, screenUv.y);
}
3. Turning hello into a Glass Centerpiece
Once the project grid was working, I moved on to the site’s visual centerpiece, the glass hello. The geometry is simple enough that I did not use Blender. I built the text in Spline, exported it as GLTF, and kept only the geometry. Three.js takes care of lighting and material.
The glass shader builds on Maxime Heckel‘s tutorial, Refraction, dispersion, and other shader light effects. I started with its refraction, chromatic dispersion, and Fresnel ideas, then added interaction, theme-aware tinting, and more control over rendering cost.
Refraction happens in two passes. First, the glass is excluded from an FBO while the scene behind it is rendered into a texture. The main scene then draws the glass, whose shader samples that texture along slightly different refraction directions to create distortion and dispersion. The glass uses its own Three.js layer so the FBO never captures the object itself. The falling stickers also need to sit behind the glass if they are to appear in the refracted sample.
Letting the highlight follow the pointer without leaving the rim
My first rim light followed the pointer directly. When the pointer approached the center of the screen, the mapped light moved onto the face of the glass. It created a broad, bright patch and weakened the contour of the letters. Apple’s Liquid Glass presentation gave me a better reference, with a highlight that travels around the edge. I kept the direction of the pointer but discarded its distance from the center.
Pointer UV is raycast onto a plane in front of the model to produce mappedX and mappedY. atan2 turns that position into an angle, and the light is always placed on a circle with a fixed radius.
Angles cannot be interpolated like ordinary numbers. Crossing from pi to negative pi may send a regular linear interpolation around the longer arc. dampAngle first wraps the difference into the range from negative pi to pi, then applies exponential smoothing.
function createRingLightFollower() {
  const defaultLight = { x: 4, y: 9 }
  const radius = Math.hypot(defaultLight.x, defaultLight.y)
  const defaultAngle = Math.atan2(defaultLight.y, defaultLight.x)
  let targetAngle = defaultAngle
  let currentAngle = defaultAngle

  const dampAngle = (current: number, target: number, lambda: number, dt: number) => {
    const shortest = Math.atan2(
      Math.sin(target - current),
      Math.cos(target - current),
    )
    return current + shortest * (1 - Math.exp(-lambda * dt))
  }

  // mappedX / mappedY come from raycasting pointer UV onto the model plane.
  return (mappedX: number, mappedY: number, inside: boolean, delta: number) => {
    if (inside && mappedX * mappedX + mappedY * mappedY > 1e-6) {
      targetAngle = Math.atan2(mappedY, mappedX)
    } else if (!inside) {
      targetAngle = defaultAngle
    }

    currentAngle = dampAngle(currentAngle, targetAngle, 6, delta)
    return {
      x: radius * Math.cos(currentAngle),
      y: radius * Math.sin(currentAngle),
    }
  }
}
The highlight still responds to the pointer’s direction, but it can no longer drift onto the front face of the glass.
Colored glass for both light and dark modes
I wanted the colored glass to keep a sense of thickness against a light background, while remaining bright and saturated enough in dark mode. For the light theme, the tint takes its cue from the Beer-Lambert law, more strictly written as T = I / I0 = 10^(-epsilon cl) (IUPAC’s Beer-Lambert law entry). The site does not simulate a real spectrum or a complete optical path. Instead, an RGB tint represents the color that survives transmission, and pow(tint, thickness) acts as an approximation of transmittance.
That same operation looked too dim against a dark background, so dark mode uses Hard Light to lift the color. uDark moves between the Beer-Lambert-inspired transmission and the art-directed blend. This is not one unified physical model. It is a visual adjustment for two very different backgrounds.
The reduced example below keeps only the two blending paths. The production material also blends two tints along the model’s local Y coordinate, and estimates variation in thickness from the angle between the view direction and the normal.
uniform vec3 uTintColor;
uniform float uTintAmount;
uniform float uThickness;
uniform float uDark;

vec3 hardLight(vec3 base, vec3 blend) {
  vec3 low = 2.0 * base * blend;
  vec3 high = 1.0 - 2.0 * (1.0 - base) * (1.0 - blend);
  return mix(low, high, step(vec3(0.5), blend));
}

vec3 applyGlassTint(vec3 color) {
  vec3 tintColor = clamp(uTintColor, 0.001, 1.0);
  float amount = clamp(uTintAmount, 0.0, 1.0);

  // Light mode: Beer-Lambert-inspired absorption.
  vec3 transmittance = pow(tintColor, vec3(max(uThickness, 0.01)));
  vec3 beerColor = mix(color, color * transmittance, amount);

  // Dark mode: an art-directed Hard Light tint.
  vec3 hardColor = mix(
    color,
    hardLight(clamp(color, 0.0, 1.0), tintColor),
    amount
  );

  return mix(beerColor, hardColor, clamp(uDark, 0.0, 1.0));
}
The comparison demo shows the tint in both themes, alongside the difference between direct pointer tracking and the ring-constrained light.
Giving the refraction something to work with
Once the rim light and tint were in place, the glass still needed color and motion behind it before its refraction and dispersion could become obvious. I drew a set of colorful stickers in Figma and placed them behind the letters. They fall through a narrow area that overlaps the word. A zOffset keeps them inside the scene sampled by the FBO, while the CPU updates particle motion and lifetimes.
Giving every sticker its own mesh and texture would create a series of draw calls and material switches, and the FBO would repeat that cost. Instead, all of the PNGs are packed into one CanvasTexture and drawn with a single InstancedMesh. The atlas only needs a uvRect and aspect ratio for each sticker. While writing the UV rectangles, I flip the Y-axis between Canvas and WebGL and inset the bounds by half a pixel so linear filtering does not pick up transparent padding.
type AtlasImage = CanvasImageSource & { width: number; height: number }

function drawAtlasEntry(
  ctx: CanvasRenderingContext2D,
  image: AtlasImage,
  x: number,
  y: number,
  atlasWidth: number,
  atlasHeight: number,
) {
  ctx.drawImage(image, x, y, image.width, image.height)

  // Canvas is top-left. WebGL UV is bottom-left.
  // The half-pixel inset avoids sampling transparent atlas padding.
  const uvRect = new THREE.Vector4(
    (x + 0.5) / atlasWidth,
    1 - (y + image.height - 0.5) / atlasHeight,
    (image.width - 1) / atlasWidth,
    (image.height - 1) / atlasHeight,
  )

  return { uvRect, aspect: image.width / image.height }
}
Each instance represents one particle. Position, rotation, and scale go into instanceMatrix, while a custom instance attribute stores the corresponding uvRect in the atlas. The vertex shader maps local UV to that sticker with uvRect.xy + uv * uvRect.zw.
// Write CPU particle state into GPU instance attributes.
for (let i = 0; i < visibleCount; i++) {
  const particle = renderParticles[i]
  const aspect = atlas.aspects[particle.textureIndex]
  const uvOffset = particle.textureIndex * 4
  const baseScale = config.scale * particle.scale

  matrixObject.position.copy(particle.position)
  matrixObject.rotation.set(0, 0, particle.rotation)
  matrixObject.scale.set(baseScale * aspect, baseScale, 1)
  matrixObject.updateMatrix()
  mesh.setMatrixAt(i, matrixObject.matrix)

  uvAttribute.setXYZW(
    i,
    atlas.uvRects[uvOffset],
    atlas.uvRects[uvOffset + 1],
    atlas.uvRects[uvOffset + 2],
    atlas.uvRects[uvOffset + 3],
  )
}

mesh.instanceMatrix.needsUpdate = true
uvAttribute.needsUpdate = true
Within a fixed instance budget, the sticker field now shares one texture, one material, and one instanced draw. The moving color makes refraction and dispersion much easier to read. Here, improving the scene behind the glass did more than adding another round of shader complexity.
4. Finishing with a Retro-Futurist Visual Language
With the glass centerpiece finished, I resisted adding another focal point. Instead, I returned to the site’s smaller details and gave them a common reference. The direction was retro-futurism. Part of it comes from optical artifacts in stage footage, and part from the dot matrices and character feedback of early digital interfaces. The former makes the glass feel more filmed. The latter shapes image changes, fullscreen transitions, and the way text appears.
Making glass feel filmed with a Star 6 filter
Refraction, dispersion, and the moving stickers gave the glass color and motion, but its highlights still looked like a clean digital render. I kept thinking about star filters in music videos and stage footage from the 80s and 90s. That led me to add the pattern of a Star 6 filter to a custom lens flare pass.
The pass keeps the bright core and colored trail of a lens flare. Three fixed axes add six rays around the highlights, making the glass feel a little more like something filmed through a camera.
First, a luminance threshold isolates bright sources in the frame. Most of them come from the glass specular. streak samples both directions along one axis. A vertical axis and two axes at plus and minus 30 degrees produce the six rays. This reduced version shows the highlight extraction and star pattern. The production pass adds further control over hot spots, trail color, and the conditions that enable the effect.
float luma(vec3 color) {
  return dot(color, vec3(0.2126, 0.7152, 0.0722));
}

float brightMask(float luminance) {
  // Keep only highlights above the configured threshold.
  float value = max(luminance - uThreshold, 0.0);
  value /= max(1.0 - uThreshold, 1e-5);
  return smoothstep(0.0, 1.0, clamp(value, 0.0, 1.0));
}

vec3 sampleBright(vec2 uv) {
  vec3 color = texture2D(tDiffuse, uv).rgb;
  return color * brightMask(luma(color));
}

vec3 streak(vec2 direction) {
  vec3 result = vec3(0.0);

  // Sample both sides of one axis.
  for (int i = 1; i <= 8; i++) {
    float distancePx = float(i) * 1.5;
    float weight = 1.0 / (1.0 + distancePx * 0.22);
    weight *= weight;

    vec2 offset = direction * distancePx;
    result += sampleBright(vUv + offset) * weight;
    result += sampleBright(vUv - offset) * weight;
  }

  return result;
}

vec3 base = texture2D(tDiffuse, vUv).rgb;
vec3 flare = base * brightMask(luma(base)) * 1.2;
vec2 px = (1.0 / uResolution) * uStreakScale;

// Three axes produce six rays.
flare += streak(vec2(0.0, px.y));
flare += streak(vec2(px.x * 0.8660254,  px.y * 0.5));
flare += streak(vec2(px.x * 0.8660254, -px.y * 0.5));
The star texture renders at half resolution and refreshes every other frame, then composites with the full scene each frame. When the bright section containing the glass is outside the viewport, the entire pass stops. There is no reason to keep paying for samples that cannot produce a visible result.
Dot matrices and character decoding as one system of feedback
Star 6 establishes the optical character of the image. The dot matrix carries the same reference into interactions and transitions. A card hover divides the screen into cells and changes images by growing a square in each one. Loading, route changes, and the mobile menu use a radial mask, with the alpha of each cell controlling the radius of a circle. They do not share one shader. What they share is a visual rule that turns continuous progress into the size of a shape on a fixed grid. A state change feels related whether it happens inside one card or across the whole page.
// Card hover: grow a square inside each screen-space cell.
vec2 cardCellUv = fract(screenUv / cellSize);
vec2 fromCenter = abs(cardCellUv - vec2(0.5));
float squareExtent = mix(0.0, 0.5, grow);
float squareDistance = max(fromCenter.x, fromCenter.y);
float squareAa = fwidth(squareDistance) * 1.5;
float squareMask = 1.0 - smoothstep(
  squareExtent - squareAa,
  squareExtent + squareAa,
  squareDistance
);

// Full-screen transition: use the radial mask to grow a circle per cell.
vec2 cellId = floor(uv / pixelSizeUv);
vec2 cellCenter = (cellId + vec2(0.5)) * pixelSizeUv;
float cellAlpha = radialMaskAlpha(cellCenter);
float radius = 0.8 * cellAlpha;
float circleDistance = distance(fract(uv / pixelSizeUv), vec2(0.5));
float circleAa = fwidth(circleDistance) * 1.5;
float circleMask = 1.0 - smoothstep(
  radius - circleAa,
  radius + circleAa,
  circleDistance
);
Text follows the same direction without repeating the dot pattern. ScrambleLines briefly cycles each character through capital letters, numbers, and symbols before settling into the intended copy, like a CLI decoding a message. All text instances share one 40ms ticker. They subscribe only after entering the viewport and after the fullscreen transition begins to open, then unsubscribe as soon as the animation is done.
Its geometry is different from the dot matrix, but both express continuous change through discrete units. Star 6 gives the glass the optical trace of a camera. Dots and decoded characters define the interface response. The code is different, but the impression belongs to one site. Material, transition, and typography all point in the same retro-futurist direction.
Reflections
The most important lesson from this project was to give DOM and WebGL reliable scroll and pointer data before deciding where an effect should appear. CSS owns structure and accessibility. WebGL comes in when curl, refraction, or a transition can add something CSS would struggle to express. In the finished site, shared state and a consistent visual rule mattered more than the number of effects.
AI helped me test shader ideas, investigate problems, and move through early implementations faster. It did not make the final decisions. Those still came down to design judgment. If I were starting again, I would set the mobile performance budget and the shutoff conditions for each effect much earlier.
After launch, the site became my first project to receive Awwwards Site of the Day, FWA of the Day, and CSSDesignAwards Website of the Day. Lenis also included it in their Showcase. I value that recognition, but I am proudest that the finished site still carries the design intent and level of craft I set out to achieve.
Credits
- Maxime Heckel, Refraction, dispersion, and other shader light effects for the foundation of the glass refraction and dispersion
- IUPAC Gold Book, Beer-Lambert law for the absorption and transmittance definition behind the glass tint
- Lenis and its GitHub repository for smooth scrolling and the host-driven
rafapproach used in the WebGL scroll sync - JOYCO, WebGL Scroll Sync as an additional reference for synchronizing scroll and WebGL
- The site uses TikTok Sans. Thanks to my former colleague @Qinyi for helping make this variable font open source.
- Strata – 3D DOM Exploder by zihan for the 3D layer visualization that helped inspect the page structure