Connect Gemini Enterprise Agents to Governed Snowflake Data with MCP
Oct 27, 2026
688 views
Putting Snowflake behind an enterprise AI agent
A useful enterprise AI agent needs more than a chat window: it needs access to company data, and that access has to respect the same permissions and governance as the rest of the business. This guide shows one way to connect Gemini Enterprise on Google Cloud to Snowflake, using the Model Context Protocol (MCP) and Google’s Agent Development Kit (ADK). The design sends a user’s question to a Snowflake Cortex Agent. Cortex Analyst uses a semantic view to translate the question into SQL, then Snowflake runs the query under the user’s OAuth session and role. The ADK agent receives structured results and presents them in natural language. That division of responsibility matters: the model can help interpret a question, while query generation and execution stay inside Snowflake’s governed boundary.Choose the integration pattern that fits
The ADK setup described here is a custom orchestration pattern. It suits developers building more involved, multi-agent systems on Google Cloud—for example, workflows that combine Snowflake data with external enterprise tools, custom reasoning loops, or shared state in Gemini Agent Engine. For a basic connection from Gemini Enterprise to Snowflake, use the joint solution described in this guide. The custom path adds flexibility, but that flexibility comes with more components to configure and govern.Where the query runs
A business user might ask, “What were our top 5 selling items in Texas last quarter?” The ADK agent passes that natural language request to the Snowflake MCP server, which invokes the Cortex Agent through `CORTEX_AGENT_RUN`. The agent uses the Cortex Analyst semantic view to produce SQL, executes it in Snowflake using the caller’s OAuth session and role privileges, then returns structured results. This is more significant than it may first appear. The client doesn’t receive a general-purpose SQL execution tool. Keeping translation tied to corporate semantic definitions can reduce schema hallucinations, while running the query within Snowflake preserves the platform’s permission checks. That still depends on correctly configured roles and semantic models; the architecture alone can’t guarantee a safe deployment.System architecture
The diagram shows the trust boundaries and numbered execution flow between the Gemini Enterprise app and Snowflake.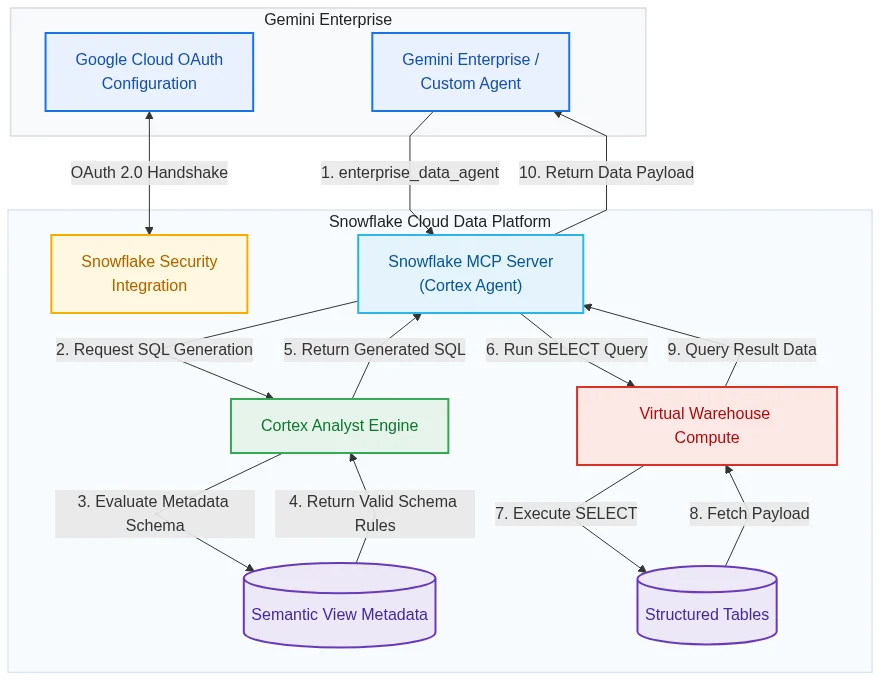
Request sequence
The sequence diagram follows the same handoff in more detail: the ADK agent passes the question over MCP, and Snowflake Cortex handles both SQL generation and governed execution.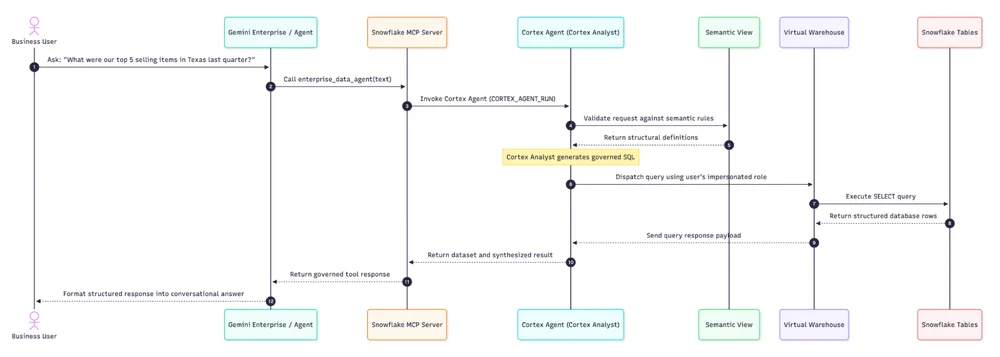
Step 1: Configure Snowflake OAuth
A generic service account can give an AI system broad access that doesn’t match the person asking the question. This setup instead uses OAuth 2.0 to bind access to the individual user. Create a confidential OAuth client in Snowflake so its client secret remains protected. The redirect URI below is Google Cloud’s official OAuth handshake receiver, and the refresh token is configured for 90 days, Snowflake’s maximum allowed validity.USE ROLE ACCOUNTADMIN;
CREATE OR REPLACE SECURITY INTEGRATION <SECURITY_INTEGRATION_NAME>
TYPE = OAUTH
ENABLED = TRUE
OAUTH_CLIENT = CUSTOM
OAUTH_CLIENT_TYPE = 'CONFIDENTIAL'
-- Google Cloud's official handshake receiver address:
OAUTH_REDIRECT_URI = 'https://vertexaisearch.cloud.google.com/oauth-redirect'
OAUTH_ISSUE_REFRESH_TOKENS = TRUE
-- Let the connection stay alive for 90 days (max Snowflake allowed limit)
OAUTH_REFRESH_TOKEN_VALIDITY = 7776000;-- Retrieve OAuth Client ID and Client Secret
SELECT SYSTEM$SHOW_OAUTH_CLIENT_SECRETS('<SECURITY_INTEGRATION_NAME>');Step 2: Set data permissions
Give the agent a dedicated Snowflake role with only the access it needs. The example grants a business user that role, then grants access to the database, schema, warehouse, semantic view, and underlying tables.USE ROLE SECURITYADMIN;
-- 1. Create a dedicated role
CREATE ROLE IF NOT EXISTS <GENAI_ROLE_NAME>;
GRANT ROLE <GENAI_ROLE_NAME> TO USER <BUSINESS_USER_NAME>;
USE ROLE SYSADMIN;
-- 2. Grant structural access
GRANT USAGE ON DATABASE <DATABASE_NAME> TO ROLE <GENAI_ROLE_NAME>;
GRANT USAGE ON SCHEMA <DATABASE_NAME>.<SCHEMA_NAME> TO ROLE <GENAI_ROLE_NAME>;
-- 3. Grant compute access
GRANT USAGE ON WAREHOUSE <WAREHOUSE_NAME> TO ROLE <GENAI_ROLE_NAME>;
-- 4. Grant access to the semantic layer
GRANT SELECT, REFERENCES ON SEMANTIC VIEW <DATABASE_NAME>.<SCHEMA_NAME>.<SEMANTIC_VIEW_NAME> TO ROLE <GENAI_ROLE_NAME>;
-- 5. Grant select privileges on underlying raw data tables
GRANT SELECT ON ALL TABLES IN SCHEMA <DATABASE_NAME>.<SCHEMA_NAME> TO ROLE <GENAI_ROLE_NAME>;ALTER USER <BUSINESS_USER_NAME> SET DEFAULT_ROLE = '<GENAI_ROLE_NAME>';
ALTER USER <BUSINESS_USER_NAME> SET DEFAULT_WAREHOUSE = '<WAREHOUSE_NAME>';Step 3: Create the Cortex Agent and MCP server
Create a Cortex Agent backed by the semantic view, then expose it through an MCP server using the `CORTEX_AGENT_RUN` tool type. Snowflake handles both SQL generation and execution under the caller’s OAuth identity and role.USE DATABASE <DATABASE_NAME>;
USE SCHEMA <SCHEMA_NAME>;
USE ROLE SYSADMIN;
-- 1. Create the Cortex Agent over your semantic view
CREATE OR REPLACE AGENT <AGENT_NAME>
COMMENT = 'Governed data assistant for business queries'
PROFILE = '{"cortex_analyst": {"semantic_models": ["<DATABASE_NAME>.<SCHEMA_NAME>.<SEMANTIC_VIEW_NAME>"]}}';
-- 2. Provision the MCP Server exposing the Cortex Agent
CREATE OR REPLACE MCP SERVER <SERVER_NAME>
FROM SPECIFICATION $$
tools:
- name: "run_cortex_agent"
type: "CORTEX_AGENT_RUN"
identifier: "<DATABASE_NAME>.<SCHEMA_NAME>.<AGENT_NAME>"
title: "Cortex Agent Assistant"
description: "Converts natural language questions into SQL and executes them directly within Snowflake using the caller's OAuth session permissions."
$$;Step 4: Find the MCP server URL
Before the ADK code can connect, grant the role access to both the agent and MCP server. Then inspect the server description in a Snowflake worksheet to find its endpoint.-- 1. Grant access to the Cortex Agent and the MCP server
USE ROLE SECURITYADMIN;
GRANT USAGE ON AGENT <DATABASE_NAME>.<SCHEMA_NAME>.<AGENT_NAME> TO ROLE <GENAI_ROLE_NAME>;
GRANT USAGE ON MCP SERVER <DATABASE_NAME>.<SCHEMA_NAME>.<SERVER_NAME> TO ROLE <GENAI_ROLE_NAME>;
-- 2. View the MCP URL
DESCRIBE MCP SERVER <DATABASE_NAME>.<SCHEMA_NAME>.<SERVER_NAME>;
-- Or:
DESC MCP SERVER <DATABASE_NAME>.<SCHEMA_NAME>.<SERVER_NAME>;https://<org_name>-<account_name>.snowflakecomputing.com/api/v2/databases/<database_name>/schemas/<schema_name>/mcp-servers/<server_name>Step 5: Connect with Google ADK
The agent code needs the MCP endpoint and an `AUTH_ID` that matches the OAuth connection registered in the Google Cloud Console. Gemini Enterprise places the authorization token in `ToolContext`; the callback below looks up the token associated with that ID and sends it as a bearer token.import os
import re
from typing import Optional
from google.adk.agents.llm_agent import LlmAgent
from google.adk.tools.mcp_tool.mcp_toolset import McpToolset
from google.adk.tools.mcp_tool.mcp_session_manager import StreamableHTTPConnectionParams
from google.adk.tools.tool_context import ToolContext
# Define the Auth ID first in your code.
# You will use this exact name when registering the agent in the Google Cloud Console.
# Gemini Enterprise maps the authorization token to this identifier in the ToolContext.
AUTH_ID = "snowflake_oauth_conn"
# 1. OAuth Header Extraction:
# Define a callback to dynamically extract the user's OAuth token injected by Gemini Enterprise
# and generate the Authorization headers required to authenticate with the Snowflake MCP.
def get_auth_headers(tool_context: Optional[ToolContext] = None) -> dict:
"""
OAuth Handling Callback: Dynamically extracts the user's OAuth token injected by Gemini Enterprise and generates the headers required to authenticate with the Snowflake MCP.
"""
token = None
if tool_context and hasattr(tool_context, "state"):
try:
# Parse the state dictionary injected by Gemini Enterprise containing authorization states
state_dict = tool_context.state.to_dict() if hasattr(tool_context.state, 'to_dict') else tool_context.state
pattern = re.compile(fr".*{re.escape(AUTH_ID)}.*", re.IGNORECASE)
# Find the active token matching our Auth ID (snowflake_oauth_conn)
matching_keys = [k for k in state_dict.keys() if pattern.match(k)]
if matching_keys:
token = state_dict.get(matching_keys[0])
except Exception as e:
print(f"Warning: Failed to read ToolContext OAuth state: {e}")
# Return authorization headers. If token is None, requests to MCP will fail.
return {
"Authorization": f"Bearer {token}",
"Content-Type": "application/json",
"Accept": "application/json, text/event-stream",
}
# 2. MCP Initialization:
# Define the Snowflake MCP URL retrieved from 'DESCRIBE MCP SERVER' directly in the code:
MCP_SERVER_URL = "<YOUR_MCP_SERVER_URL>" # Replace with the URL retrieved from 'DESCRIBE MCP SERVER'
# Initialize the Snowflake MCP Toolset using this URL.
snowflake_mcp = McpToolset(
connection_params=StreamableHTTPConnectionParams(
url=MCP_SERVER_URL
),
header_provider=get_auth_headers
)
# 3. Build the Agent:
# Construct the LlmAgent using the Gemini 2.5 Flash model and attach the Snowflake MCP Toolset.
root_agent = LlmAgent(
model="gemini-2.5-flash",
name="enterprise_data_analyst",
instruction=(
"You are an enterprise data analyst. Use the `enterprise_data_agent` tool "
"on the Snowflake MCP server to answer business questions. Pass the user's "
"natural language question to the tool, which translates it into SQL and "
"executes it directly within Snowflake's governed boundary, then present "
"the results clearly to the user."
),
tools=[snowflake_mcp]
)Step 6: Arrange and deploy the project
For deployment to Agent Runtime in Agent Platform, use this project layout:snowflake_agent/
├── agent.py # The agent definition and MCP connection code (from Step 5)
├── __init__.py # Package initializer exposing the agent
├── .env # Environment configurations (Google Cloud Project, etc.)
└── requirements.txt # List of project dependencies (google-adk, etc.)# Snowflake ADK Agent package
from .agent import root_agentGOOGLE_CLOUD_PROJECT="<YOUR_GCP_PROJECT_ID>"
GOOGLE_CLOUD_LOCATION="<LOCATION>"
GOOGLE_GENAI_USE_VERTEXAI="TRUE"google-adk[mcp]==2.3.0
google-genai==2.10.0
pydantic-settings==2.14.2
google-cloud-aiplatform[agent_engines]>=1.50.0# Deploy the agent to the Google Cloud Agent Runtime
agents-cli deploy --deployment-target agent_runtime